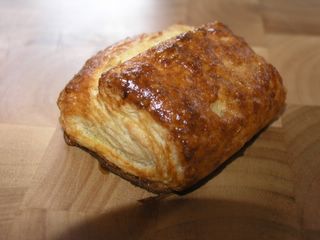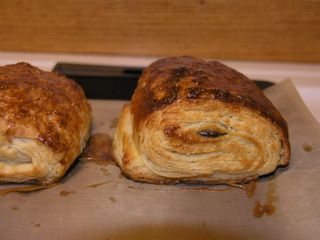
When Clement announced the theme for SHF:5 - Puff Pastry: hundreds and hundreds of layers my immediate thoughts were, in order:
1. I don't like puff pastry.
2. I bet that's a bitch to make.
3. I'm not participating.
4. I wonder how hard it is?
5. Oh well. Someone else will eat it anyway.
And that was that. Buying ready-made puff pastry was not an option for me at all. Since I don't like it very much, the whole fun would be in the making. Or so I thought. My first choice was classic Wienerbrod, danishes. However, I balked at the idea of making a complicated dough, a complicated filling AND a glaze. That just seemed too much. I briefly touched on croissants, before landing on my final choice: Petits Pains au Chocolat. Since I never had done something like this before, I followed a recipe to the letter. My chosen one comes from Swedish pastry chef Jan Hedh, author of the wonderful book Chokladpassion. (I think you can easily see what that translates into.)
So, I was going to make a yeasted puff pastry. Not all puff pastries are made with yeast. The trick to making puff pastry, to put it shortly, is to make an elastic dough, get butter to be inside the dough and STAY there, and then roll it out and fold it over. Many times. That's how you get the layers. Easy in theory. A little less easy in practise. But definitely do-able. So, on with the recipe!

Petits Pains au Chocolat
by Jan Hedh
20 g fresh yeast
125 g tepid water
150 g full-fat milk
500 g flour (in Sweden, you should use Vetemjöl Special that has extra protein. In other countries, look for an extra-strong flour.)
55 g sugar
10 g salt
300 g unsalted cold butter
200 g excellent dark chocolate
2 eggs for glazing
Day one:
Dissolve the yeast in the water. Add the milk. Add the flour, sugar and salt. Knead for five minutes by hand, or for three minutes using a machine. (I used my trusty Kitchen-Aid.) Let the dough rise for two hours, or until it has doubled in size. Knock it down and let it rest overnight, in the fridge. Check it after an hour, if it's started to rise, knock it down again. It's not supposed to rise any more. (I had major problems with this part - check my post on the Dough That Wouldn't Sleep.)
Day two:
Cut a cross on the top of the dough. Roll out each quarter, so you have a vague flower shape. Bash the cold butter with the rolling pin (this is fun!) so it becomes a little bit soft. (Alternatively you could probably cut it into thin slices. But the bashing was fun.) Put this in the middle of the dough, and fold each part up over the butter. It needs to be fully enveloped and not allowed to escape. Flour the dough and your workarea, and roll out the dough into a large rectangle. Measure - it should be 40 * 76 cm. (That is really large.) Make a threefold, wrap it in plastic and let rest in the fridge for half an hour. Repeat twice more - roll out, threefold, rest in fridge. It will be increasingly more difficult. Definitely make sure you don't tear the dough so the butter oozes out!
After the third rest, roll it out one final time. Same size as before. Trim the edges, and cut the dough with a knife into 8 small rectangles. (Once lengthwise, four times crosswise) Divide the chocolate into 16 equal squares. (I used large buttons from Weiss Chocolat, and just added four or five to each pastry.) Glaze the dough with beaten egg, and add a piece of chocolate to each. Make another threefold, and put 8 on each baking sheet. Glaze with beaten egg again, and let the pastries rise for two hours. Warm the oven to 190 degrees C, and give the pastries a final glazing with beaten egg. Bake for 12-15 minutes until they are golden brown.

Edith, enjoying a little taste too.
So. Was it hard? Yeah. A little. The dough kept tearing towards the end, and my working area got very messy. Was it impossible though? Not at all. No. It was fine. And they tasted absolutely wonderful. All in all, I am very very happy I took part in this SHF, and I already look forward to the next! Keep those challenges coming!

I'm impressed and jealous that you made your own puff pastry dough. Yeasted, no less! The finished product looks fresh from a professional bakery!
ReplyDeletecute cute kitty kat...
ReplyDeleteThank you guys! Really - give it a try sometimes! :) It wasn't as hard as I thought it would be, but you do need to be patient and have a large work area. Next time, I'd prefer not to have kittens all over the kitchen, but that's not always an option... :)
ReplyDeleteAnne, congratulations on your beautiful pastry! I was really curious about the use of yeast. What changes with this addition? The texture? Does it taste very different from regular pastry?
ReplyDeleteRachel - to know for sure, I'd have to bake one without and compare, and that's not going to happen for a little while. :) But a guess is that it makes it a bit more chewy rather than flaky, and I think it also helps it to rise more evenly. At least I'm guessing that, based on Clement's post on how hard it was to get it to rise properly - I had no problems at all with that.
ReplyDeleteHi Anne,
ReplyDeleteYour petit pans look fantastic...congrats!
Cheers,
Moira
Yours really does look loftily puffed up, doesn't it? If I ever try making puff pastry, I think I'll give your recipe a shot.
ReplyDeleteHi Anne - Your pain au chocolat looks gorgeous! and your cat is so sweet...
ReplyDelete